
WordPress で scss の勉強がしてみたくなり、 色々と調べたところ 「Atom」 が便利との声が多かったので、 当方に環境を構築した際の覚書です。
インストールしたシステム環境はこちら。
- macOS Mojave ver.10.14.2
- Mac mini (Late 2012)
- プロセッサ 2.5 GHz Intel Core i5
- メモリ 4 GB 1600 MHz DDR3
- Homebrew インストール済み
Atom のインストール
公式サイトよりダウンロードします。
解凍し、 Application フォルダへ移動します。
scss コンパイル環境の構築
Homebrew のインストール
インストールコマンド
公式サイトのスクリプトをターミナルより実行します。
/usr/bin/ruby -e "$(curl -fsSL https://raw.githubusercontent.com/Homebrew/install/master/install)"
上記は 2018 年 12 月のものです。
当方の環境は、 Homebrew インストール済みなので、 更新をかけます。
Homebrew の更新
brew upgrade
すると、
 Error: The following directories are not writable by your user:
 /usr/local/share/man/man8

  You should change the ownership of these directories to your user.
   sudo chown -R $(whoami) /usr/local/share/man/man8
といったエラーが出たので、 指示されるがまま権限変更します。
sudo chown -R ユーザー名 /usr/local/share/man/man8
Homebrew 最終確認
更新をかけた後、
Updating Homebrew...
の表示のみで終了すれば完了です。
nodebrew のインストール
続いて nodebrew のインストールを行います。
インストールコマンド
brew install nodebrew
すると、 色々とアドバイスされました。
 ==> Caveats
You need to manually run setup_dirs to create directories required by nodebrew:
  /usr/local/opt/nodebrew/bin/nodebrew setup_dirs

 Add path:
  export PATH=$HOME/.nodebrew/current/bin:$PATH

 To use Homebrew's directories rather than ~/.nodebrew add to your profile:
  export NODEBREW_ROOT=/usr/local/var/nodebrew

 Bash completion has been installed to:
  /usr/local/etc/bash_completion.d

 zsh completions have been installed to:
  /usr/local/share/zsh/site-functions
==> Summary
🍺  /usr/local/Cellar/nodebrew/1.0.1: 8 files, 38.6KB, built in 25 seconds
上手く行かなかったらアドバイスに従おうと思い、 とりあえず無視して進めます。
node.js のインストール
インストールコマンド
nodebrew install-binary latest
上記のコマンドを打ったところ、
 Fetching: https://nodejs.org/ 省略
 Warning: Failed to create the file
Warning: /Users/ 省略
 Warning: No such file or directory
と怒られたので、 やはり nodebrew インストール時のアドバイスに従う事に。 まずは、
curl -L git.io/nodebrew | perl - setup
で調べてみると、
   % Total    % Received % Xferd  Average Speed   Time    Time     Time  Current
                                 Dload  Upload   Total   Spent    Left  Speed
  0     0    0     0    0     0      0      0 --:--:--  0:00:01 --:--:--     0
  0     0    0     0    0     0      0      0 --:--:--  0:00:02 --:--:--     0
  0     0    0     0    0     0      0      0 --:--:--  0:00:02 --:--:--     0
100 24634  100 24634    0     0   8403      0  0:00:02  0:00:02 --:--:--  8403
Fetching nodebrew...
Installed nodebrew in $HOME/.nodebrew

 ========================================
Export a path to nodebrew:

 export PATH=$HOME/.nodebrew/current/bin:$PATH
========================================
と表示され、 ここでも 「export PATH=$HOME/.nodebrew/current/bin:$PATH」 と指示されます。
アドバイス通りに修正
言われるがまま、
echo 'export PATH=$HOME/.nodebrew/current/bin:$PATH' >> ~/.bash_profile
と実行し、
source ~/.bash_profile
のコマンドで反映させます。 これで PATH が通ったはずなので再度インストールを試みると、
 nodebrew install-binary
latest Installed successfully
とやっと成功 w
使用するバージョンを指定
インストールされた latest (最新版) のバージョンを調べるために
nodebrew ls
で確認してみると、
 v11.5.0

 current: none
とのことなので、 使用するバージョンを指定します。
 nodebrew use v11.5.0
use v11.5.0
node.js 最終確認
バージョンを調べると、 この様に帰ってきました。
 node -v
v11.5.0
npm -v
6.4.1
node-sass のインストール
インストールコマンド
npm install -g node-sass
でインストールを行います。
node-sass 最終確認
 node-sass -v
node-sass 4.11.0 (Wrapper) [JavaScript]
libsass   3.5.4 (Sass Compiler) [C/C++]
無事、 インストールされました。
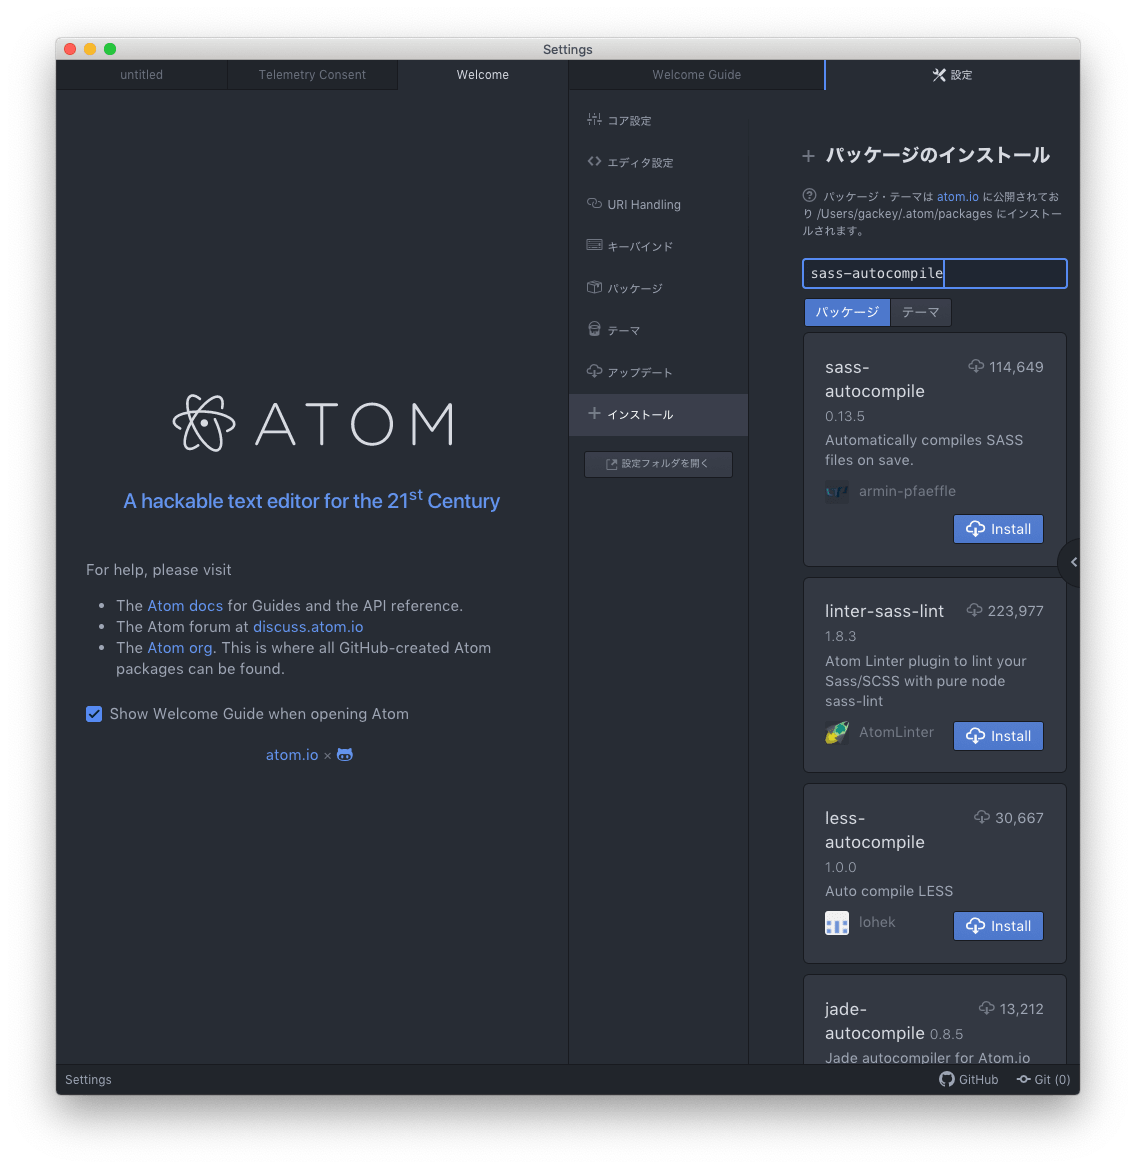
Atom での設定
まずは日本語化

メニューバー → Atom → Preference より、 「japanese-menu」 を検索し、 インストール。
sass-autocompile のインストール

同じく、 「sass-autocompile」 を検索し、 インストール。
以上で完了です。
テスト
 // test.scss
 $thx_orange: hsla(44, 98%, 44%, 1.0);
 $thx_indigo: hsla(210, 98%, 32%, 1.0);

 $thx_main_color: $thx_indigo;

 h2{
   background-color: lighten($thx_main_color, 50%);
} サンプルとして、 こんなコードを打ち込み、 「test.scss」 として保存すると、
h2{background-color:#a4d1fe} この様なコードが同階層に 「test.min.css」 として保存されます。
以下、 参考にさせて頂いたページです。